

How To Setup Astonish Blogger Template

Astonish is a one of the most Modern, Clean and Creative Blogger Theme. A creative and unique style with fantastic slider, numerous post formats and excellent promo blocks will attract new visitors and you will breathe new life into your blog. Astonish is equipped with various of widgets which will help you to publish your blog more professionally. To make it easy for you we have published this detailed documentation, so that you can setup your blog correctly. You have made a good decision by choosing our template.
You can check the live demo or download the template through the button below and also Please Read this documentation carefully in order to set up your blog and please note that there’s no support for free users.
You can check the live demo or download the template through the button below and also Please Read this documentation carefully in order to set up your blog and please note that there’s no support for free users.
Video Documentation
You can check this below video to understand the setup process much more easily, just click the below image to watch the video directly on YouTube, or click this link - How To Setup Jasmine Blogger Template - Way2Themes

Newsticker Widget
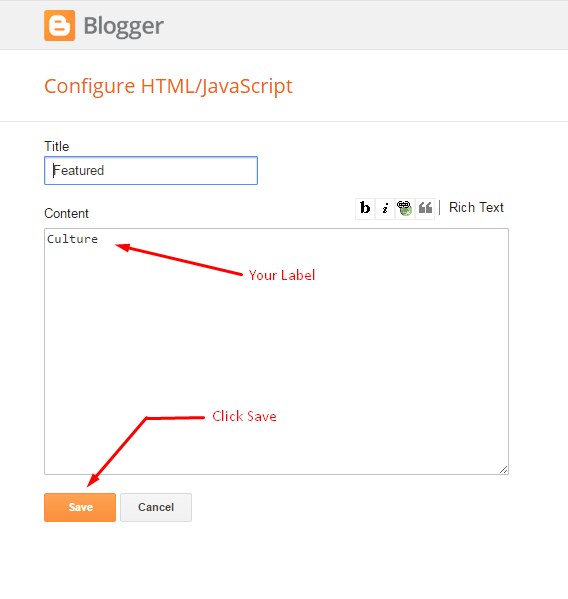
Access your blog Layout > click Edit link.then you have three options to enter in the content box:
- no: If you don't want the Slider to show on your website, all you have to do is to enter "no" in the content box.
- [recent]: The Slider will show the most recent posts (pay attention to the square brackets).
- Label name: The Slider will show the most recent posts of this specific label name (Note: keep in mind that label names are case sensitive. So for example "tech" is not the same as "Tech" or "TECH").
Image Example:
Note #1: the default number of posts that will be shown by the News Ticker is 6 and you can change that as follows:
1- Go to your template dashboard then click on "Template" then "Edit HTML".
2- Click anywhere inside the window that shows the HTML content then press "ctrl + f" and search for "newTickerPostsNum = 6" (without the quotes). Change the number "6" to anything else.
Note #2: You can change the speed of the News Ticker by searching for "newsTickerSpeed = 4" and change the number "4" to any number (the number will represent the number of seconds that takes the News Ticker to go from one post to another).
Top Social Widget
Go to your blogger dashboard > Layout > click Edit link on Top Social widget.
In the "New Site Name" field replace the word "facebook" with any social media website (twitter, youtube, google-plus, etc...).
Note: keep in mind that this template uses the "Font Awesome" service for the icons.
Follow this link for the complete set of icons that this service provides: "http://fortawesome.github.io/Font-Awesome/icons" .
Note: keep in mind that this template uses the "Font Awesome" service for the icons.
Follow this link for the complete set of icons that this service provides: "http://fortawesome.github.io/Font-Awesome/icons" .

Main Menu/ DropDown/ Multi DropDown
Access your blog Layout > click Edit link on Main Menu widget.
Normal Link : Features
Sub Link: _Sub Link 1.0 (before the link add "_") 1 underscore
Sub Link 2: __Sub Link 1.1 (before the link add "__") 2 underscore
Sub Link 2: __Sub Link 1.1 (before the link add "__") 2 underscore

Slider Widget
Access your blog Layout > click Edit link.then you have three options to enter in the content box:
- no: If you don't want the Slider to show on your website, all you have to do is to enter "no" in the content box.
- [recent]: The Slider will show the most recent posts (pay attention to the square brackets).
- Label name: The Slider will show the most recent posts of this specific label name (Note: keep in mind that label names are case sensitive. So for example "tech" is not the same as "Tech" or "TECH").
Image Example:
Featured Post Widget (Purple Coloured)
Access your blog Layout > click Edit link.then you have two options to enter in the content box:
- no: If you don't want the Featured Posts section to show on your website, all you have to do is to enter "no" in the content box.
- Label name: The Must Read section will show the most recent posts of this specific label name (Note: keep in mind that label names are case sensitive. So for example "tech" is not the same as "Tech" or "TECH").
Image Example:
Home Widget
Click on "Add A Gadget" then choose "HTML/Javascript".This template have 4 home boxes/styles to choose from.
These are "bsummary", "twocolumns", "grids" and "bleft".
Here is how you can setup the widgets:
[label name][one of the boxes/styles mentioned above]
For example: [technolgy][bleft]

Image Example:


Image Example:


Image Example:

For example: [people][twocolumns]

Image Example:

Note: you can change the default number of posts for the following boxes/styles: "twocolumns"and "grids". Here is how you can change that for the "twocolumns" or "grids":
1- Go to your template dashboard then click on "Template" then "Edit HTML".
2- Click anywhere inside the window that shows the HTML content then press "ctrl + f" and search for "twocolumnsPostsNum = 6" or "gridsPostsNum = 4" (without the quotes). Change the numbers "6" and "4" to anything else.
Extra widgets
This template has 2 custom widgets:Access your blog Layout > Click on "Add A Gadget" then choose "HTML/Javascript".
- Social Counter
Click on "Add A Gadget" then choose "HTML/Javascript".
In the "content" area insert the following:
[socialcounter] [social media website name][link for social profile][any number]Look at the following picture:

- Recent Post
Click on "Add A Gadget" then choose "HTML/Javascript".
In the "content" area insert the following:
recentposts1 or recentposts2Look at the following picture:


If you choose "recentposts1" then your posts will look like the following picture:

But if you choose "recentposts2" then your posts will look like the following picture:

- Random Post
randomposts1 or randomposts2The same things we said about the recent posts will apply to the random posts.
Note: The default number of posts that will be shown by the "recent posts" and "random posts" widgets is 5. To change that you can search "sidebarRecentPostsNum = 5" or "sidebarRandomPostsNum = 5". Change the number "5" to anything else.
In the footer you can choose the "recent posts widget" and "random posts widget" by following the same steps mentioned in the Sidebar section. And you can change the default number of posts that will be shown by these two widgets by searching for "footerRecentPostsNum = 5" "footerRandomPostsNum = 5".
Pagenavigation Results
This template have a pagination widget like the one you see in the demo.If you want to use it you have to search for " showPagination = false" and change "false" to "true". But keep in mind two things:
1- You can't use the pagination if you have more than 10000 posts (ten thousand posts).
2- For the pagination to work properly and without any problems you shouldn't have two or more posts that were published in less than one minute, and you shouldn't publish two or more posts in less than one minute (in other words, you must have a gap of at least 1 minute between each post and the other). I know that it's unusual and rare to publish two or more posts in the same minute but I had to warn you about that so you don't face any problems.
Facebook Page Plugin:
<center><div id="fb-root"></div>
<script>undefinedfunctionundefinedd, s, id) {
var js, fjs = d.getElementsByTagNameundefineds)[0];
if undefinedd.getElementByIdundefinedid)) return;
js = d.createElementundefineds); js.id = id;
js.src = "//connect.facebook.net/en_US/sdk.js#xfbml=1&version=v2.5&appId=1760806057479925";
fjs.parentNode.insertBeforeundefinedjs, fjs);
}undefineddocument, 'script', 'facebook-jssdk'));</script>
<div class="fb-page" data-href="https://www.facebook.com/soratemplates/" data-width="350" data-height="230" data-hide-cover="false" data-show-facepile="true" data-show-posts="false"><div class="fb-xfbml-parse-ignore"></div></div></center>
or you can follow this tutorial if above method won't work
Theme Colors
Access your blog Template > click Customize.Here is where you can change the main color of the model, using your favorite colors.

Installation And Custom Services
We provide plenty of templates for free but if you want something unique for your blog then let us create a unique design for your blog, Just tell us your needs and we will convert your dream design into reality. We also Provide Blogger Template Installation Service. Our Installation service gives you a simple, quick and secure way of getting your template setup without hassle.
How To Setup Astonish Blogger Template
 Reviewed by TemplatesYard
on
June 25, 2017
Rating:
Reviewed by TemplatesYard
on
June 25, 2017
Rating:
Reviewed by TemplatesYard
on
June 25, 2017
Rating:


[nature][bsummary] this widget not working in my blog plz say how to use.
ReplyDeletethe shortcodes not working m like bleft, grids etc.. also feutured posts
ReplyDeletealso , you might like this not working
ReplyDeleteHi. I bought Astonish Blogger Template. I don`t know how to configure the Responsive Ad Spot. Could you help me? I can not find any information regarding the Ad Spot on your website. Thanks
ReplyDeleteJust copy the ad code and paste it into the ad widget from layout.
DeleteBuenas, compre una platilla y desapareció el slider he intentado de todas las formas pero no lo he logrado, por favor ayúdenme
ReplyDeleteGood, buy a few months ago the template Astonish and followed everything that indicated to me
ReplyDeletehttps://www.sorabloggingtips.com/2017/06/how-to-setup-astonish-blogger-template.html#comment-form
From one moment to another the slider stopped working and went to the other side, I climbed again the template but does not change, remains the same and I do not know what to do.
Please help me
This is the blog
http://www.bnjmedios.com/
the edit link of Newsticker Widget and social widget are not showing.
ReplyDeleteplease help me .
Please share your blog url.
Deletewww.cyberiancities.com
Deletethis is my blog urs
You deleted the html of social widget.
DeleteI did not delete anything. I downloaded the fresh theme 2 times, yet it is not an edit button, nor is it visible in the layout. If the edit link is not shown, then how do I delete the script ... and I have not even seen the html code. Plzz give me solution what i do now...
ReplyDelete