

How To Setup Trendy Travel Blogger Template [Way2Themes]

Trendy Travel is a dedicated template for travel bloggers. It has carousel widget to showcase important content. Trendy travel is equipped with various of widgets which will help you to publish your blog more professionally. To make it easy for you we have published this detailed documentation, so that you can setup your blog correctly. You have made a good decision by choosing our template.
You can check the live demo or download the template through the button below and also Please Read this documentation carefully in order to set up your blog and please note that there’s no support for free users.
You can check the live demo or download the template through the button below and also Please Read this documentation carefully in order to set up your blog and please note that there’s no support for free users.
Video Documentation
You can check this below video to understand the setup process much more easily, just click the below image to watch the video directly on YouTube, or click this link - How To Setup Jasmine Blogger Template - Way2Themes

Top Menu
Go to your blogger dashboard > Layout > click Edit link on Top Menu widget.

Social Top/Footer
Access your blog Layout > click Edit link on Social Top widget.
Icons Available { facebook, twitter, gplus, rss, youtube, skype, stumbleupon, tumblr, vine, stack-overflow, linkedin, dribbble, soundcloud, behance, digg, instagram, pinterest, delicious, codepen }
Note: The Social Profile Names are case sensitive.
Note: The Social Profile Names are case sensitive.

Main Menu/ DropDown/ Multi DropDown
Access your blog Layout > click Edit link on Main Menu widget.
Normal Link : Features
Sub Link: _Sub Link 1.0 (before the link add "_") 1 underscore
Sub Link 2: __Sub Link 1.1 (before the link add "__") 2 underscore
Sub Link 2: __Sub Link 1.1 (before the link add "__") 2 underscore

How to add icons in links ?
For the main menu it is necessary to convert the icons! >> Site to Convert <<
Example Normal Link: <i class="fa fa-newspaper-o"></i>Latest News
Sub Link: _<i class="fa fa-hand-o-left"></i>Left Sidebar
Image Example:

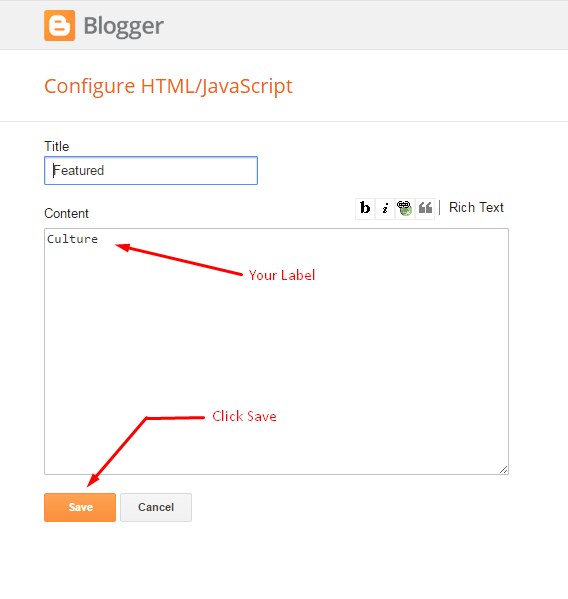
Label Based Slider Post Widgets

Access your blog Layout > click Edit link. add your desired name in the title section and desired label in the html/javascript area.
- Featured Post. (Max post - 5)

Subscription Widget
Access your blog Layout > click Edit link on Subscription widget.Paste this Below code into it.
<div id='subscribe-css'>
<p class='subscribe-note'><i class="fa fa-gift" aria-hidden="true"></i> <span>Subscribe</span> <span class='itatu'>&</span> Get All The Latest Updates Delivered Straight Into Your Inbox For Free!</p>
<div class='subscribe-wrapper'>
<div class='subscribe-form'>
<form action='http://feedburner.google.com/fb/a/mailverify?uri=soratemplates' class='subscribe-form' method='post' onsubmit='window.open ('http://feedburner.google.com/fb/a/mailverify?uri=soratemplates', 'popupwindow', 'scrollbars=yes,width=550,height=520');return true' target='popupwindow'>
<input name='uri' type='hidden' value='soratemplates'/><input name='loc' type='hidden' value='en_US'/><input autocomplete='off' class='subscribe-css-email-field' name='email' placeholder='Enter your Email'/><input class='subscribe-css-email-button' title='' type='Submit' value='Submit'/></form>
</div>
</div>
</div>
Instagram Widget
Access your blog Layout > click Edit link on Instagram Widget.Paste this Below code into it.
<div id='instafeed'/>In above code you you will see a
<script type='text/javascript'>//<![CDATA[
var feed = new Instafeed({
get: 'user',
userId: 3541708255,
limit:6,
sortBy:'random',
accessToken: '3541708255.1677ed0.5e79fa74dcac4a52bea0ebba51eacb88',
template: '<li><a href="{{link}}" target="_blank"><img src="{{image}}" /><div class="insta-likes"><div style="display: table; vertical-align: middle; height: 100%; width: 100%;"><span style="display: table-cell; vertical-align: middle; height: 100%; width: 100%;">{{likes}} <i class="fa fa-heart"></i><br/>{{comments}} <i class="fa fa-comment"></i></span></div></div></a></li>',
resolution: 'standard_resolution'
});
feed.run();
//]]>
</script></div>
accessToken: ‘3541708255.1677ed0.5e79fa74dcac4a52bea0ebba51eacb88′,
This – 3541708255.1677ed0.5e79fa74dcac4a52bea0ebba51eacb88 is a access token ID.
Now you need to create you new one and replace with this.
How to Create Instagram Access Token
1. you need access token for instagram widget to work
Go to this url-> http://instagram.pixelunion.net/
Login Via your instagram Account and Generate access token in a single click.
2. Once you get access token just replace with this access token with in a your code.
Author Box
Access your blog Theme > click Edit Html> and then find the following coding.
<span>Way2themes is a blogger resources site is a provider of high quality blogger template with premium looking layout and robust design. The main mission of way2themes is to provide the best quality blogger templates.</span>
Change the above details with your own.
Pagenavigation Results
Access your blog Theme > click Edit Html> and then find the following coding.<script type='text/javascript'>
/*<![CDATA[*/
var perPage=7;
var numPages=6;
var firstText ='First';
var lastText ='Last';
var prevText ='« Previous';
var nextText ='Next »';
var urlactivepage=location.href;
var home_page="/";
/*]]>*/
</script>
Change the value of var perPage=7; from 7 to any number you want (Archive).
Facebook Page Plugin:
<center><div class="fb-padding"><div id="fb-root"></div>
<script>(function(d, s, id) {
var js, fjs = d.getElementsByTagName(s)[0];
if (d.getElementById(id)) return;
js = d.createElement(s); js.id = id;
js.src = "//connect.facebook.net/pt_BR/sdk.js#xfbml=1&version=v2.3&appId=1395743857335531";
fjs.parentNode.insertBefore(js, fjs);
}(document, 'script', 'facebook-jssdk'));</script>
<div class="fb-page" data-href="https://www.facebook.com/soratemplates" data-width="280" data-height="230" data-hide-cover="false" data-show-facepile="true" data-show-posts="false"><div class="fb-xfbml-parse-ignore"></div></div></div></center>
or you can follow this tutorial if above method won't work
Theme Colors
Access your blog Template > click Customize.Here is where you can change the main color of the model, using your favorite colors.

Installation And Custom Services
We provide plenty of templates for free but if you want something unique for your blog then let us create a unique design for your blog, Just tell us your needs and we will convert your dream design into reality. We also Provide Blogger Template Installation Service. Our Installation service gives you a simple, quick and secure way of getting your template setup without hassle.
How To Setup Trendy Travel Blogger Template [Way2Themes]
![How To Setup Trendy Travel Blogger Template [Way2Themes]](https://blogger.googleusercontent.com/img/b/R29vZ2xl/AVvXsEhBvKRo8n8NPkWTxYVq_-Fak9-vO6RWgv5Jh4kjLuoOng0GmwRt8kVTOORoblt0MxFNAprBwc1Q0FWi9B7-Ughidj2hyfpq4zd2FcPqjXGSJTZcUcxCNV-MFox9YPYhYoVDQFyP4f8UGBw1/s72-c/Trendy+Travel.png) Reviewed by TemplatesYard
on
July 22, 2017
Rating:
Reviewed by TemplatesYard
on
July 22, 2017
Rating:
Reviewed by TemplatesYard
on
July 22, 2017
Rating:


No comments:
Post a Comment