

How To Setup Leafy Blogger Template

Leafy is the great portfolio Blogger Template that enables you to create a professional portfolio website and manage your blog. Leafy is equipped with various widgets that will help you publish your blog more professionally. To make it easy for you we have published this detailed documentation, so that you can setup your blog correctly. You have made a good decision by choosing our template.
You can check the live demo or download the template through the button below and also Please Read this documentation carefully in order to set up your blog and please note that there’s no support for free users.
You can check the live demo or download the template through the button below and also Please Read this documentation carefully in order to set up your blog and please note that there’s no support for free users.
Basic Setup
Video Documentation
You can check this below video to understand the setup process much more easily, just click the below image to watch the video directly on YouTube, or click this link - How To Setup Leafy Blogger Template - SoraTemplates

Header Background
Access your blog Theme > click Edit Html> and then find the following coding.
#header-wrapper {
text-align: center;
padding:0;
background: url(https://blogger.googleusercontent.com/img/b/R29vZ2xl/AVvXsEjKS6oETVdC_jJI0vza05ktVKwL2-Lklu7nu6p5zayVmPyIog4TZRXKs8urn-phovXEyDa_rwN_89TcKvQ1AZ3jJ0vg40X9u4xk9854NUMuwOo7YCLpIC6NiX3c4PpYxSHt-8xhu7mQPFc/s1600/head-back.jpg) no-repeat center bottom;
background-attachment: fixed;
background-size: cover;
margin-bottom: 10px;
height:100vh;
box-sizing:border-box;
position:relative;
width: 100%;
}
Change the black highlighted code with your own image link.
Note:- Don't change anything else, otherwise the background will not work properly.
Main Menu/DropDown/Multi DropDown
Access your blog Layout > click Edit link on Main Menu widget.
Normal Link : Features
Sub Link: _Sub Link 1.0 (before the link add "_") 1 underscore
Sub Link 2: __Sub Link 1.1 (before the link add "__") 2 underscore
Sub Link 2: __Sub Link 1.1 (before the link add "__") 2 underscore

Header Title & Header Flashing Text
Access your blog Layout > click Add a Gadget > HTML/JavaScript on Header Title & Logo Description Widget Section, and then add your title in the title section and description text into the content section. Have a look to the format below.
<p>
Welcome
</p>
Logo Description ( Flashing Text Should be in this format below ). Have a look to the format below.
<div class='type'>
<span>I Am</span><p></p>
</div>
<script language='javascript' type='text/javascript'>//<![CDATA[
$(function() {
"use strict";
$(".header-logo-desc p").typed({
strings: ["John Doe", "a Developer" , " a Designer"], //Headlines(Change It)
loop: true,
startDelay: 1e3,
backDelay: 2e3
});
});
//]]></script>
Social Top/Footer
Access your blog Layout > click Edit link on Social Top widget.
Icons Available { facebook, twitter, gplus, rss, youtube, skype, stumbleupon, tumblr, vine, stack-overflow, linkedin, dribbble, soundcloud, behance, digg, instagram, pinterest, delicious, codepen }

Fixed Menu
Access your blog Theme > click Edit Html> and then find the following coding.
<ul id='nav'>
<li class='current'><a href='#header-wrapper'>Home</a></li>
<li><a href='#section-2'>Services</a></li>
<li><a href='#section-3'>Works</a></li>
<li><a href='#main-wrapper'>Portfolio</a></li>
<li><a href='#section-5'>About</a></li>
<li><a href='#section-6'>Contact</a></li>
</ul>
Change the details with your own.
Note:- Don't change the href=' ' Values Otherwise the menu will not work.
What Do We Offer (Section-1)
It has two types of widgets in it first one is skill bar and the other one is skill details.
Access your blog Theme > click Edit Html> and then find the following coding.
- Skill Bar's
Access your blog Theme > click Edit Html> and then find the following coding.
<div class='skills'>
<!-- skill -->
<dl>
<dt>HTML</dt>
<dd class='skill-percent html' data-percent='90'/>
<dt>CSS</dt>
<dd class='skill-percent css' data-percent='85'/>
<dt>jQuery</dt>
<dd class='skill-percent jquery' data-percent='70'/>
<dt>SCSS</dt>
<dd class='skill-percent scss' data-percent='60'/>
<dt>Javascript</dt>
<dd class='skill-percent javascript' data-percent='50'/>
<dt>PHP</dt>
<dd class='skill-percent php' data-percent='30'/>
<dt>XML</dt>
<dd class='skill-percent xml' data-percent='40'/>
</dl>
<!-- #skill -->
</div>
Here are the things you need to change.
Access your blog Theme > click Edit Html> and then find the following coding.
- Red Highlighted code is for the abilities you want to mention.
- Blue Highlighted code is for the score for those abilities.
- Skill Details
Access your blog Theme > click Edit Html> and then find the following coding.
<div class='skill-details'>
<!-- First -->
<div class='special-tiles wow fadeInUp' data-wow-delay='0s'>
<span class='special-icons'>
<i aria-hidden='true' class='fa fa-heart-o'/>
</span>
<span class='special-content'>
<h6 class='special-heading'>Web Designing</h6>
<p class='special-text'>Lorem Ipsum is simply dummy text of the printing and typesetting industry. Lorem Ipsum has been the industry's. </p></span>
</div>
<!-- First One Ends -->
<!-- Second -->
<div class='special-tiles wow fadeInUp' data-wow-delay='0.2s'>
<span class='special-icons'>
<i aria-hidden='true' class='fa fa-birthday-cake'/>
</span>
<span class='special-content'>
<h6 class='special-heading'>App Development</h6>
<p class='special-text'>Lorem Ipsum is simply dummy text of the printing and typesetting industry. Lorem Ipsum has been the industry's. </p></span>
</div>
<!-- Second Ends -->
<!-- Third -->
<div class='special-tiles wow fadeInUp' data-wow-delay='0.3s'>
<span class='special-icons'>
<i aria-hidden='true' class='fa fa-cutlery'/>
</span><span class='special-content'>
<h6 class='special-heading'>Web Application</h6>
<p class='special-text'>Lorem Ipsum is simply dummy text of the printing and typesetting industry. Lorem Ipsum has been the industry's. </p></span>
</div>
<!-- Third Ends -->
</div>
Here are the things you need to change.
- Red Highlighted code is for the icons you want to mention. (fontawesome - http://fontawesome.io/cheatsheet/)
- Blue Highlighted code is for the titles.
- Green Highlighted code is for the Descriptions.
Our Working Process (Section-2)
Access your blog Theme > click Edit Html> and then find the following coding.
<div class='sora-works-box' id='section-3'><div class='works-wrap row'><div class='works-title'><h4>Our Working Process</h4>
<span>Our process on creating awesome projects.</span></div><div style='clear: both;'/><!-- First --><div class='works-tiles'><span class='works-icons'><li data-percent='25'><span class='text'><i aria-hidden='true' class='fa fa-lightbulb-o'/></span><span class='bar-circle-right' style='transform: rotate(90deg);'/><span class='bar-circle-left'/><span class='bar-circle-cover'/></li></span><h6 class='works-heading'>1. Concept</h6><p class='works-text'>Lorem Ipsum is simply dummy text of the printing and typesetting industry. </p></div><!-- First One Ends --><!-- Second --><div class='works-tiles'><span class='works-icons'><li data-percent='50'><span class='text'><i aria-hidden='true' class='fa fa-clipboard'/></span></li></span><h6 class='works-heading'>2. PREPARE</h6><p class='works-text'>Lorem Ipsum is simply dummy text of the printing and typesetting industry. </p></div><!-- Second Ends --><!-- Third --><div class='works-tiles'><span class='works-icons'><li data-percent='75'><span class='text'><i aria-hidden='true' class='fa fa-paint-brush'/></span></li></span><h6 class='works-heading'>3. RETOUCH</h6><p class='works-text'>Lorem Ipsum is simply dummy text of the printing and typesetting industry. </p></div><!-- Third Ends --><!-- Fourth --><div class='works-tiles'><span class='works-icons'><li data-percent='100'><span class='text'><i aria-hidden='true' class='fa fa-gift'/></span></li></span><h6 class='works-heading'>4. FINALIZE</h6><p class='works-text'>Lorem Ipsum is simply dummy text of the printing and typesetting industry. </p></div><!-- Fourth Ends --></div></div>
Here are the things you need to change.
- <h4>Steps in Our Works</h4> - Main Title.
- <span>Our process on creating awesome projects.</span> - Title Description
- <i aria-hidden='true' class='fa fa-lightbulb-o'/> -Icon (fontawesome - http://fontawesome.io/cheatsheet/)
- <h6 class='works-heading'>1. Concept</h6> -Tiles title
- <p class='special-text'>Lorem Ipsum is simply dummy text of the printing and typesetting industry. Lorem Ipsum has been the industry's. </p> -Description
Main Slider
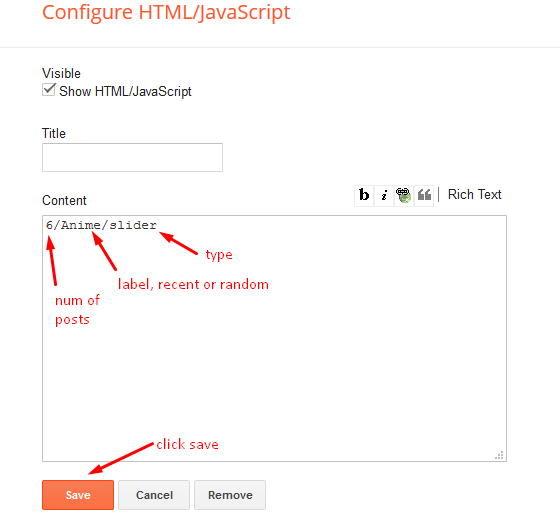
Access your blog Layout > click Add a Gadget > HTML/JavaScript on Main Slider section, you must place the following names highlighted in blue below.
Shortcode: Number of Posts/Label, recent or random/slider
Example: 6/Anime/slider
Counters (Section-3)
You can change background, number, details and icons in this section.
Change the red highlighted code with your own image link.
Note:- Don't change anything else, otherwise the background will not work properly.
- Background
.counter-box {
background: url(https://blogger.googleusercontent.com/img/b/R29vZ2xl/AVvXsEi5Ate6vaUPFxON_c_c31cnlAXedeuzZI0JRHkszeybgbRQJERT_F5QVfGVGrlbJXJXQfXtcKjk0voUZ9LeLk1mzt8SZTFYlhv_zGjZAn7WNItY7gC-YV1JmIPudnjuQMqciW2wnQmjj40/s1600/sg-back.jpg) no-repeat;
background-attachment: scroll;
background-size: cover;
background-position: 50% 0;
overflow: hidden;
margin: 0 auto;
padding: 40px 0;
position:relative;
}
Change the red highlighted code with your own image link.
Note:- Don't change anything else, otherwise the background will not work properly.
- Number, details and icons
Access your blog Theme > click Edit Html> and then find the following coding.
<div class='counter-box-item'>
<i class='color lnr lnr-code'/>
<h1 class='counter-sora'>3000</h1>
<div class='counter-sora-text'>Projects Completed</div>
</div>
<div class='counter-box-item'>
<i class='color lnr lnr-coffee-cup'/>
<h1 class='counter-sora'>50</h1>
<div class='counter-sora-text'>Happy Customers</div>
</div>
<div class='counter-box-item'>
<i class='color lnr lnr-book'/>
<h1 class='counter-sora'>324</h1>
<div class='counter-sora-text'>Cups Of Coffee</div>
</div>
<div class='counter-box-item'>
<i class='color lnr lnr-gift'/>
<h1 class='counter-sora'>1234</h1>
<div class='counter-sora-text'>Awards</div>
</div>
Here are the things you need to change.
- Red Highlighted code is for the icons you want to mention. (fontawesome - http://fontawesome.io/cheatsheet/)
- Blue Highlighted code is for the numbers.
- Green Highlighted code is for the Descriptions.
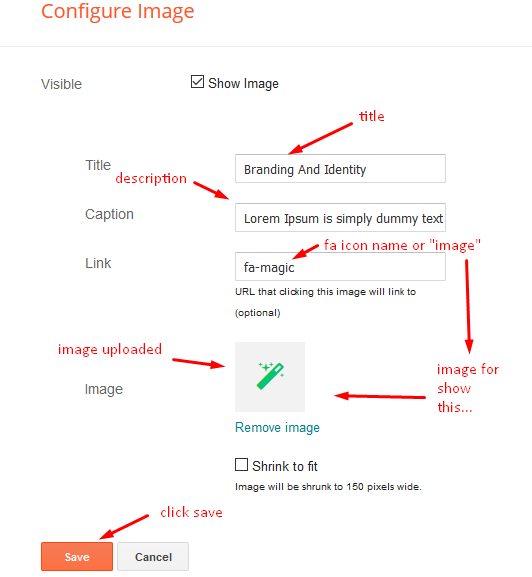
Service List Widget
Access your blog Layout > click Edit icon > on Service List widget's.Widget Settings EX:
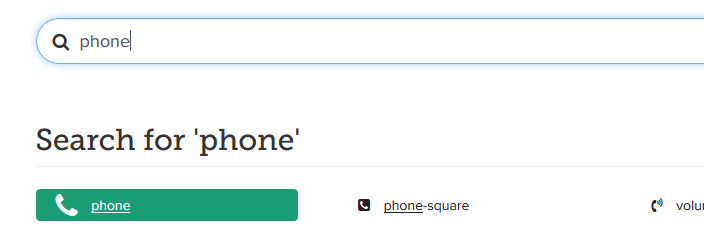
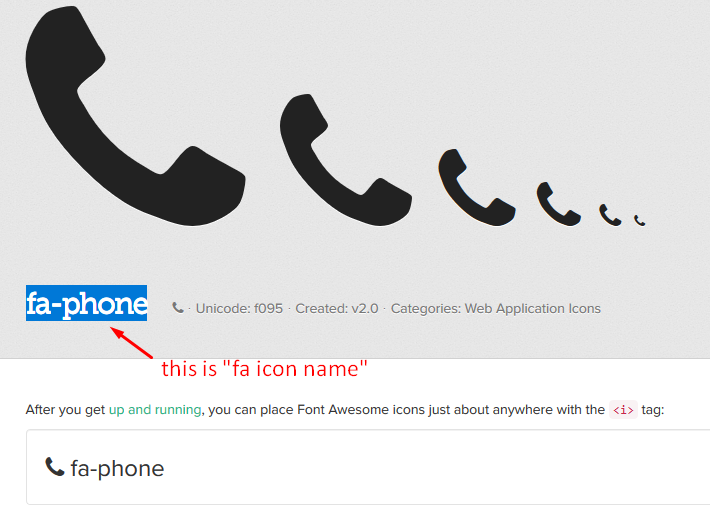
How to get FontAwesome or Remixicon icon name ??
Step 1: Go to https://fontawesome.com/v4.7.0/icons/
Our Portfolio (Section-4):
This is the title for recent posts you will publish.
Access your blog Theme > click Edit Html> and then find the following coding.
Access your blog Theme > click Edit Html> and then find the following coding.
<div class='Portfolio-title'><h4>Our Portfolio.</h4>
<span>A creative agency that believes in the power of creative ideas and great design.</span></div>
Change the details with your desired one.
Featured Listings
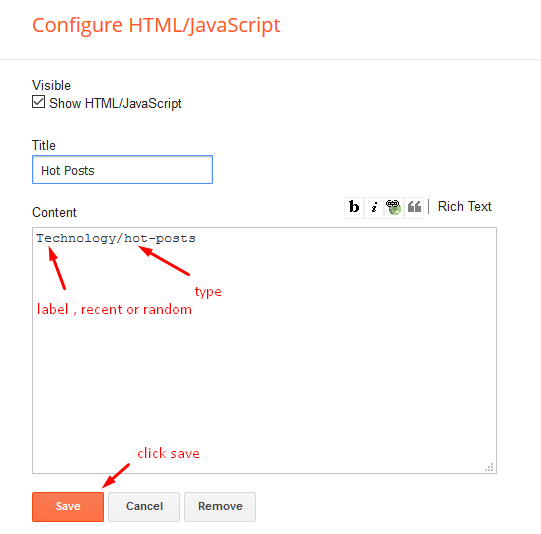
Access your blog Layout > click Add a Gadget > HTML/JavaScript on Featured Summary section, you must place the following names highlighted in blue below.
Shortcode: Label, recent or random/hot-posts
Example: Technology/hot-posts
Testimonials (Section-5)
Access your blog Theme > click Edit Html> and then find the following coding.
<div class='gallery-cell'>
<div class='testimonial'>
<img class='testimonial-avatar' src='https://blogger.googleusercontent.com/img/b/R29vZ2xl/AVvXsEjWE7mlRWCAqI2EBjjFXgVOg0cXa53McnZKnDJuUmxqGMcsTQFzVve0U7G9HLkqmnxCRWZKPqxKOivgCtEjOfRICPwFRYgN1gHmQOqQ2IliVNdTATivhkKXx7mDpyj3gCDzgT8-9gwcX2g/s400/128.jpg'/>
<q class='testimonial-quote'>"Lorem ipsum dolor sit amet, consectetur adipiscing elit. Duis mauris ex, gravida ut leo eu, rhoncus porta orci. Fusce vitae rutrum nulla."</q>
<span class='testimonial-author'>Joe Smith, CEO of Cubix</span>
</div>
</div>
<div class='gallery-cell'>
<div class='testimonial'>
<img class='testimonial-avatar' src='https://blogger.googleusercontent.com/img/b/R29vZ2xl/AVvXsEi9hC0mzmbfMaleF3sSqgrtAfbjrKGJiySUgc43ys8o_70CNsIcz58gE7wquEh_j-cIdEk42GR5qBgAca5hspgVKhLAHMCK_YSw_2f3QimhbGPL_wI3aFLen8qjXBF8T1q1jWGkAcZLqVo/s400/128+%25281%2529.jpg'/>
<q class='testimonial-quote'>"Lorem ipsum dolor sit amet, consectetur adipiscing elit. Duis mauris ex, gravida ut leo eu, rhoncus porta orci. Fusce vitae rutrum nulla."</q>
<span class='testimonial-author'>Lisa Jones, Freelance Web Developer</span>
</div>
</div>
<div class='gallery-cell'>
<div class='testimonial'>
<img class='testimonial-avatar' src='https://blogger.googleusercontent.com/img/b/R29vZ2xl/AVvXsEhoSNusV76yE2O9y2kvWQnMuMRGheKi97VPLrGC3RmIefPKj_QHtDZDQuzWGHq1GdEy_wLKgBwgnXLrACh1xSQdOMvHUf64ml7Rkgv0cVB6hCpvCDiw7JqXj0Eisif5Q5c4g1ojXesD-LI/s400/128.jpg'/>
<q class='testimonial-quote'>"Lorem ipsum dolor sit amet, consectetur adipiscing elit. Duis mauris ex, gravida ut leo eu, rhoncus porta orci. Fusce vitae rutrum nulla."</q>
<span class='testimonial-author'>Ryan Waltz, Front-End Developer</span>
</div>
</div>
Here are the things you need to change.
- Red Highlighted code is for the users image.
- Blue Highlighted code is for the review.
- Green Highlighted code is for the user details.
Meet The Team (Section-6):
Access your blog Theme > click Edit Html> and then find the following coding.
<div class='about-wrap row'>
<div class='about-title'>
<h4>Meet The Team</h4>
<span>Our process on creating awesome projects.</span>
</div>
<div style='clear: both;'/>
<!-- First -->
<div class='about-tiles wow fadeInLeft' data-wow-delay='0.2s' style='visibility: visible;'>
<div class='team-member text-center'>
<div class='team-img'>
<img alt='' src='https://blogger.googleusercontent.com/img/b/R29vZ2xl/AVvXsEi1YwymmWpYRFQ4bbREOWo7Y-Js4CL5oHwHJRJ2eLYxSwt0IjLzi3MjQ4pnCIm3iBgk11lF7SzSc7VYvr_pfPTJSrdSf9k65lrUfOi1h_TT2KoQs3S0oqcymkZTX7vJL0TN7jETbDl8ULw/s1600/team_1.jpg'/>
<div class='overlay'>
<div class='team-details text-center'>
<p>
Our web design team will spend time with our digital marketing team.
</p>
<div class='socials mt-20'>
<a href='#'><i class='fa fa-facebook'/></a>
<a href='#'><i class='fa fa-twitter'/></a>
<a href='#'><i class='fa fa-google-plus'/></a>
<a href='#'><i class='fa fa-envelope'/></a>
</div>
</div>
</div>
</div>
<h6 class='team-title'>John Marshall</h6>
<span>Designer</span>
</div>
</div>
<!-- First One Ends -->
<!-- Second -->
<div class='about-tiles wow fadeInUp' data-wow-delay='0s' style='visibility: visible;'>
<div class='team-member text-center'>
<div class='team-img'>
<img alt='' src='https://blogger.googleusercontent.com/img/b/R29vZ2xl/AVvXsEiHq3qB8eBzRTKs4s0Hoi6gAU4hFFDLdNyzRZVMbk3Gu5hGNBsbqvOeCU7Om-4WjZ3wkBsj9y9QHUsqjFsEhyphenhyphenrX5cRxi-tGJALICglTU4ZXFB90tJ6azpUaKkXxRb88EVTwl_mL8MS0tbE/s1600/team_2.jpg'/>
<div class='overlay'>
<div class='team-details text-center'>
<p>
Our web design team will spend time with our digital marketing team.
</p>
<div class='socials mt-20'>
<a href='#'><i class='fa fa-facebook'/></a>
<a href='#'><i class='fa fa-twitter'/></a>
<a href='#'><i class='fa fa-google-plus'/></a>
<a href='#'><i class='fa fa-envelope'/></a>
</div>
</div>
</div>
</div>
<h6 class='team-title'>Steve Roberts</h6>
<span>Photographer</span>
</div>
</div>
<!-- Second Ends -->
<!-- Third -->
<div class='about-tiles wow fadeInRight' data-wow-delay='0.2s' style='visibility: visible;'>
<div class='team-member last text-center'>
<div class='team-img'>
<img alt='' src='https://blogger.googleusercontent.com/img/b/R29vZ2xl/AVvXsEgx0wVngJjzyk-W_XIN4R5wMzZUS1Sj84-ckpKrBeptpFsygNiRH0yfqYlSnXkKXAWPaBWTERSTu_yh-bWGIGVMdu0auIUU3sNhBdIi-A-j9iGoANz9dTRvnwt32o5x7j0ma-n7WQ2jkDk/s1600/team_3.jpg'/>
<div class='overlay'>
<div class='team-details text-center'>
<p>
Our web design team will spend time with our digital marketing team.
</p>
<div class='socials mt-20'>
<a href='#'><i class='fa fa-facebook'/></a>
<a href='#'><i class='fa fa-twitter'/></a>
<a href='#'><i class='fa fa-google-plus'/></a>
<a href='#'><i class='fa fa-envelope'/></a>
</div>
</div>
</div>
</div>
<h6 class='team-title'>Michael Cartney</h6>
<span>Designer</span>
</div>
</div>
<!-- Third Ends -->
</div>
Change the highlighted part's with your own details for every team member.
Get In Touch (Section-7):
There are few things which you can change in this section.
Access your blog Theme > click Edit Html> and then find the following coding.
- Headings and description.
Access your blog Theme > click Edit Html> and then find the following coding.
<div class='contact-title'>
<h4>Get in Touch</h4>
<span>Feel free to drop us a line to contact us</span>
</div>
- Feel free To Contact
Access your blog Theme > click Edit Html> and then find the following coding.
<div class='contact-other'>
<h1 class='con-title'>Feel free To Contact</h1>
<p class='con-text'>
Lorem ipsum dolor sit amet, consectetur adipisicing elit. Voluptate dolores, quasi unde quisquam facilis at ullam aperiam similique dicta voluptatibus!
</p>
<ul class='con-list'>
<li><i class='lnr lnr-map'/>3066 Stone Lane, Wayne, Pennsylvania.</li>
<li><i class='lnr lnr-phone'/>+610-401-6021, +610-401-6022</li>
<li><i class='lnr lnr-envelope'/>admin@mydomain.com</li>
<li><i class='lnr lnr-earth'/>www.yourdomain.com</li>
</ul>
</div>
Change the highlighted part's with your own details for every team member.

Contact Form
To make the contact form work you have to do nothing, it works automatically hurrah!!
Post List Widget
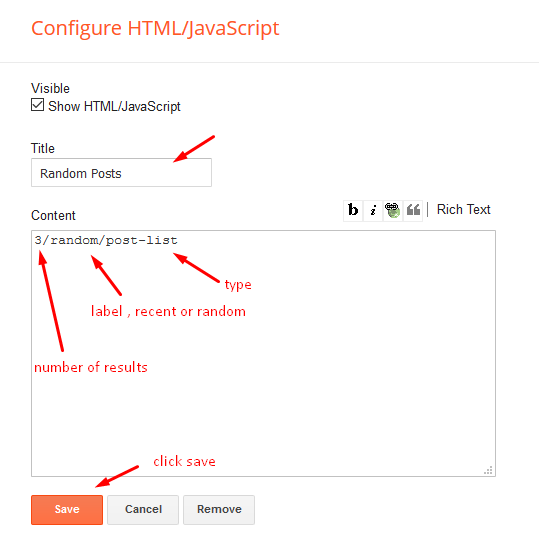
Access your blog Layout > click Add a Gadget > HTML/JavaScript on Sidebar or Footer section and follow the instructions below.
Shortcode: Results number/Label, recent or random/post-list
Label Posts: 3/Technology/post-listRecent Posts: 3/recent/post-listRandom Posts: 3/random/post-list
Footer Navigation
Access your blog Layout > click Edit link on Topnav widget.

it automatically picks pages and page links but in case it doesn't pick, please see the above image to add one, you can also add external links(Links from somewhere else).
Facebook Page Plugin:
<center><div class="fb-page" data-href="https://www.facebook.com/soratemplates/" data-width="360" data-small-header="false" data-adapt-container-width="true" data-hide-cover="false" data-show-facepile="true"></div></center>
or you can follow this tutorial if above method won't work
How to Add Responsive Facebook Like Box Widget In Blogger
Template Customization
Access your blog Template > click Customize.Colors

Installation And Custom Services
We provide plenty of templates for free but if you want something unique for your blog then let us create a unique design for your blog, Just tell us your needs and we will convert your dream design into reality. We also Provide Blogger Template Installation Service. Our Installation service gives you a simple, quick and secure way of getting your template setup without hassle.
How To Setup Leafy Blogger Template
 Reviewed by TemplatesYard
on
June 23, 2022
Rating:
Reviewed by TemplatesYard
on
June 23, 2022
Rating:
Reviewed by TemplatesYard
on
June 23, 2022
Rating:


No comments:
Post a Comment