

How To Setup Misho Blogger Template

You can check the live demo or download the template through the button below and also Please Read this documentation carefully in order to set up your blog and please note that there’s no support for free users.
Basic Setup
Video Documentation
You can check this below video to understand the setup process much more easily, just click the below image to watch the video directly on YouTube, or click this link - How To Setup Misho Blogger Template - SoraTemplates

Main Menu/DropDown/Multi DropDown/Mega Menu
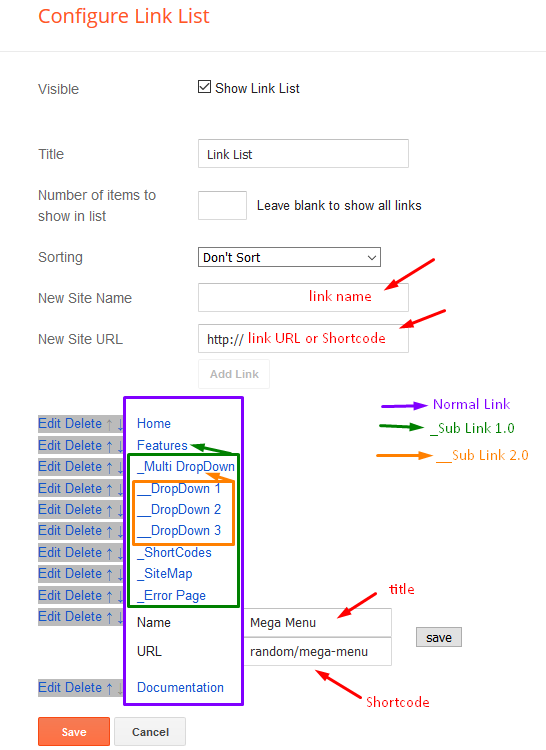
Access your blog Layout > click Edit icon on Main Menu widget.
Normal Link : FeaturesSub Link: _Sub Link 1.0 (before the link add "_") 1 underscoreSub Link 2: __Sub Link 1.1 (before the link add "__") 2 underscoreMega Shortcode by Label: Technology/mega-menuMega Shortcode by Recent: recent/mega-menuMega Shortcode by Random: random/mega-menu
Mega Tab Menu
To display tabbed label specific products you need to add a shortcode into the widget, just copy the below shortcode and and paste it into the url section of the widget.
Shortcode mTabs Ex: [getMega label="kids/women/men/smartwatch/laptop" type="mtabs"]

You must add the desired labels, into the shortcode, to make it work.
Note: In the mTabs type, you can add as many labels as you want, there is no defined limit! but remember they must be separated by "/".
To display tabbed label specific products you need to add a shortcode into the widget, just copy the below shortcode and and paste it into the url section of the widget.
You must add the desired labels, into the shortcode, to make it work.
Note: In the mTabs type, you can add as many labels as you want, there is no defined limit! but remember they must be separated by "/".
Top Social
Access your blog Layout > click Edit icon on Social Top widget.
Icons Avaliables { facebook, twitter, gplus, rss, youtube, skype, stumbleupon, tumblr, vk, stack-overflow, github, linkedin, dribbble, soundcloud, behance, digg, instagram, pinterest, twitch, delicious, codepen, reddit, whatsapp, snapchat, email }

Top Menu
Access your blog Layout > click Edit link on Top Menu widget.

How to add icons in the top navigation?
Select an icon >> FontAwesome <<, Example <i class="fa fa-download"></i>
Example: <i class="fa fa-download"></i>Download this Theme

<i class="fa fa-download"></i>Slider
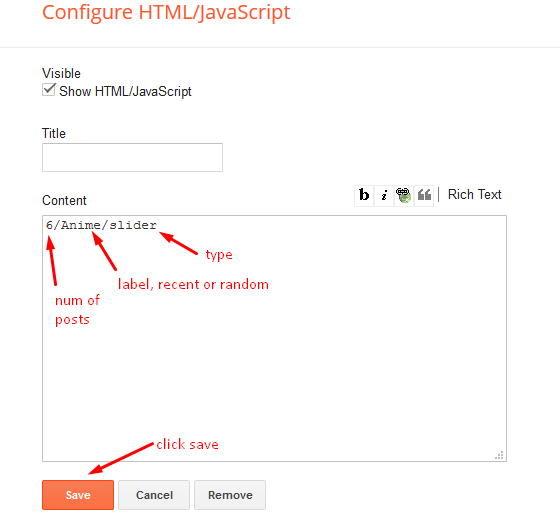
Access your blog Layout > click Add a Gadget > HTML/JavaScript on Slider section, you must place the following names highlighted in blue below.
Shortcode: number of posts/label name/shortcode
Example: 8/Technology/slider
Access your blog Layout > click Add a Gadget > HTML/JavaScript on Slider section, you must place the following names highlighted in blue below.
Shortcode: number of posts/label name/shortcode
Example: 8/Technology/slider
Product Services
Access your blog Layout > click Edit icon > on Product Services widget's.
Widget Settings EX:
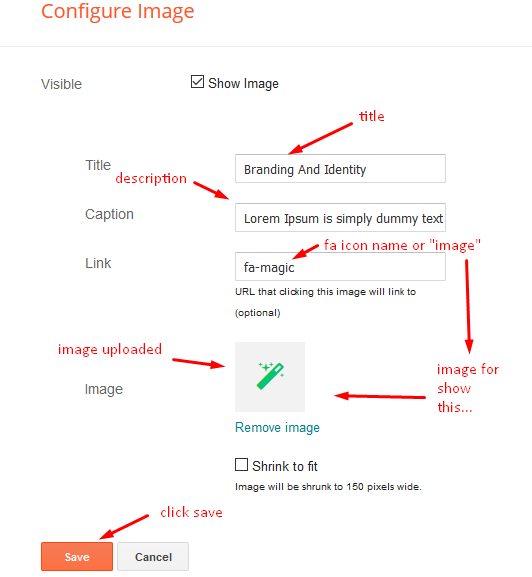
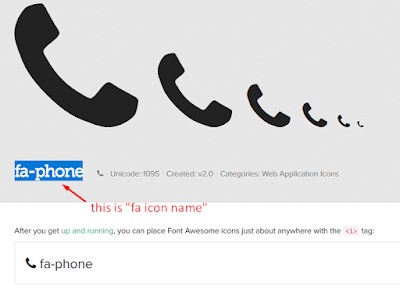
How to get FontAwesome icon name ??
Step 1: Go to https://fontawesome.com/v4.7.0/icons/
Find icon EX:
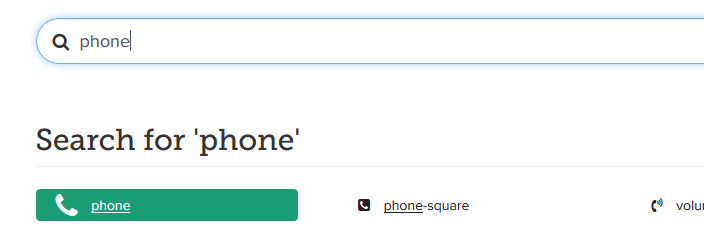
Step 2: Open icon page and copy "fa icon name".
EX:
Access your blog Layout > click Edit icon > on Product Services widget's.
Widget Settings EX:
How to get FontAwesome icon name ??
Step 1: Go to https://fontawesome.com/v4.7.0/icons/
Find icon EX:
Step 2: Open icon page and copy "fa icon name".
EX:
Info Box ( 01, 02, 03, 04,05 )
Access your blog Layout > click Edit icon > on Info Box 01, Info Box 02, Info Box 03, Info Box 04 and Info Box 05 widget.
Example:
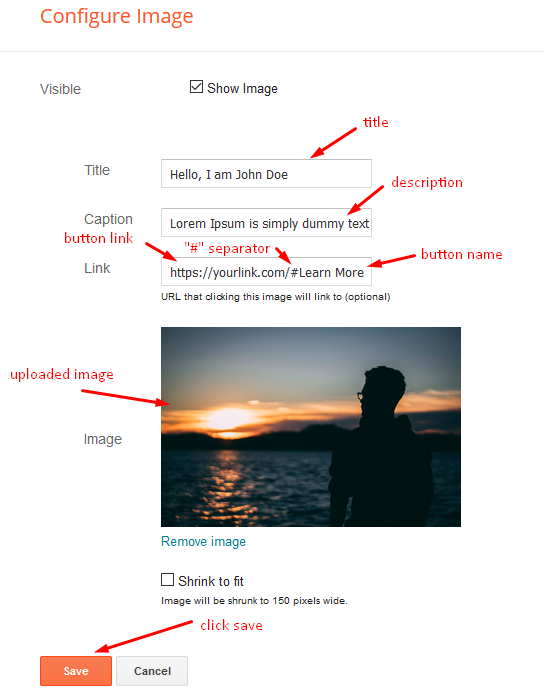
Access your blog Layout > click Edit icon > on Info Box 01, Info Box 02, Info Box 03, Info Box 04 and Info Box 05 widget.
Example:
Vertical Icon Menu
Access your blog Layout > click Edit link on Top Menu widget.
 How to add icons in the top navigation?
Select an icon >> FontAwesome <<, Example <i class="fa fa-download"></i>
Example: <i class="fa fa-download"></i>Download this Theme
Access your blog Layout > click Edit link on Top Menu widget.
How to add icons in the top navigation?
Select an icon >> FontAwesome <<, Example
<i class="fa fa-download"></i>Example: <i class="fa fa-download"></i>Download this Theme
Main Testimonials
Access your blog Layout > click Edit icon > on Main Testimonial widget.
Example:
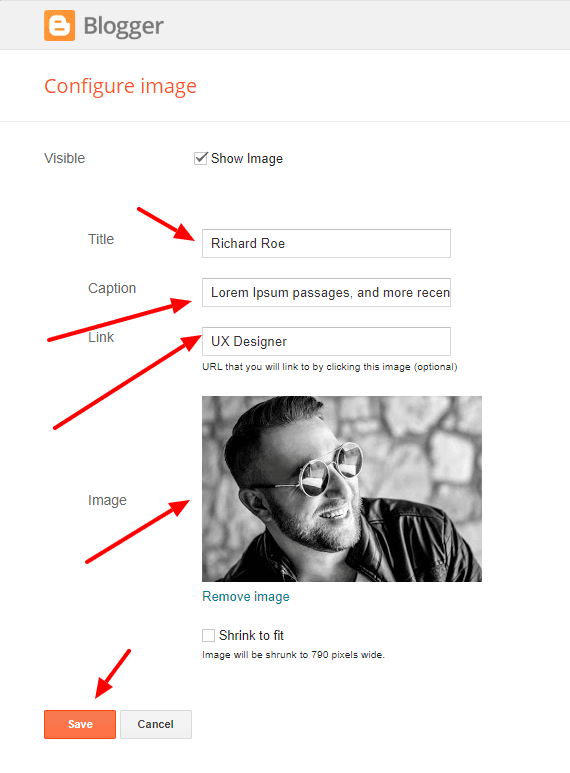
Access your blog Layout > click Edit icon > on Main Testimonial widget.
Example:

Verticle Tag
This is nothing but a label widget, just keep the setting similar as below image.
 Note: For ideal condition always limit the number of labels to 8.
This is nothing but a label widget, just keep the setting similar as below image.
Note: For ideal condition always limit the number of labels to 8.
Product Tabs
Access your blog Layout > click Edit icon on Product Tabs widget. To display tabbed label specific products you need to add a shortcode into the widget, just copy the below shortcode and and paste it into the url section of the widget.
Shortcode: [getMega label="kids/laptop/mens/mobile/smartwatch" type="mtabs"]
 You must add the desired labels, into the shortcode, to make it work.
Note: In the mTabs type, you can add as many labels as you want, there is no defined limit! but remember they must be separated by "/".
Access your blog Layout > click Edit icon on Product Tabs widget. To display tabbed label specific products you need to add a shortcode into the widget, just copy the below shortcode and and paste it into the url section of the widget.
Shortcode: [getMega label="kids/laptop/mens/mobile/smartwatch" type="mtabs"]
Note: In the mTabs type, you can add as many labels as you want, there is no defined limit! but remember they must be separated by "/".
Home Ads 01, 02 & 03
Access your blog Layout > click Edit icon on in the sections Home ads 01, 02 & 03
HTML/JavaScript Ex:

Access your blog Layout > click Edit icon on in the sections Home ads 01, 02 & 03
HTML/JavaScript Ex:

Marquee Menu
Access your blog Layout > click Edit icon on Marquee Menu widget.
Access your blog Layout > click Edit icon on Marquee Menu widget.
Hot Offers
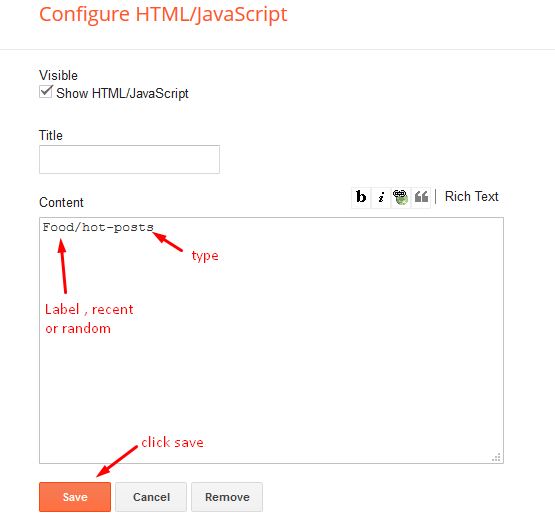
Access your blog Layout > click Add a Gadget > HTML/JavaScript on Hot Offers section, you must place the following names highlighted in blue below.
Shortcode: Label, recent or random/hot-posts
Example: Food/hot-posts
Featured Products 1,2,3 & Product List 1-2
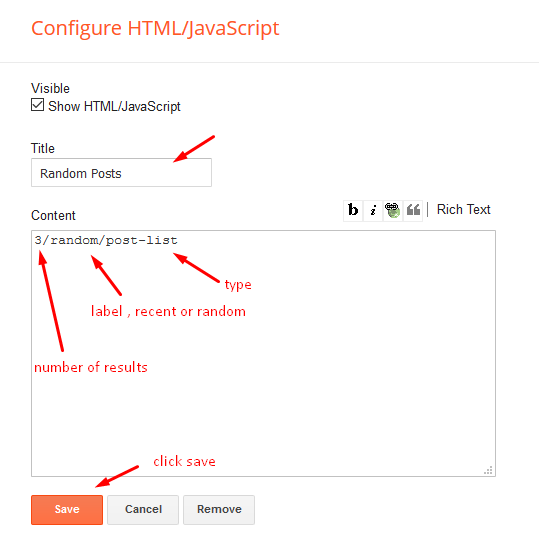
Access your blog Layout > click Add a Gadget > HTML/JavaScript on Featured Products 1,2,3 & Product List 1-2 section, you must place the following names highlighted in blue below.
Shortcode: Results number/Label, recent or random/post-list
Label Posts: 3/Technology/post-listRecent Posts: 3/recent/post-listRandom Posts: 3/random/post-list
Access your blog Layout > click Add a Gadget > HTML/JavaScript on Featured Products 1,2,3 & Product List 1-2 section, you must place the following names highlighted in blue below.
Shortcode: Results number/Label, recent or random/post-list
Label Posts: 3/Technology/post-list
Recent Posts: 3/recent/post-list
Random Posts: 3/random/post-list
Post List Widget
Access your blog Layout > click Add a Gadget > HTML/JavaScript on Sidebar or Footer section, you must place the following names highlighted in blue below.
Shortcode: Results number/Label, recent or random/post-list
Label Posts: 3/Technology/post-listRecent Posts: 3/recent/post-listRandom Posts: 3/random/post-list
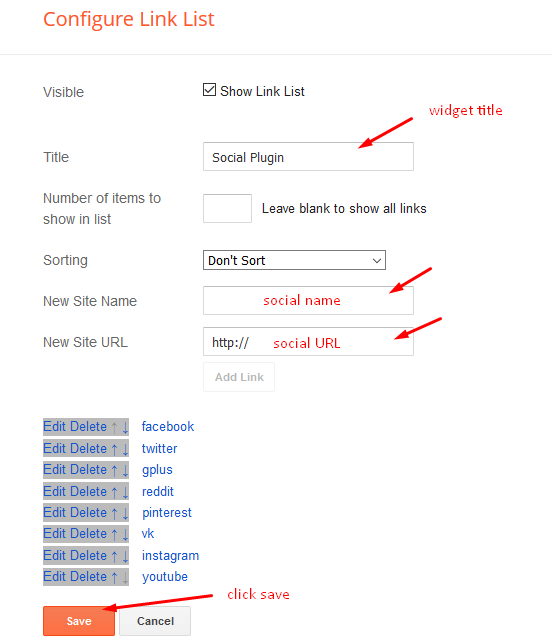
Social Widget (Sidebar)
Access your blog Layout > click Edit icon on Social Widget widget.
Icons Avaliables { blogger, facebook, twitter, gplus, rss, youtube, skype, stumbleupon, tumblr, vk, stack-overflow, github, linkedin, dribbble, soundcloud, behance, digg, instagram, pinterest, twitch, delicious, codepen, reddit, whatsapp, snapchat, email }
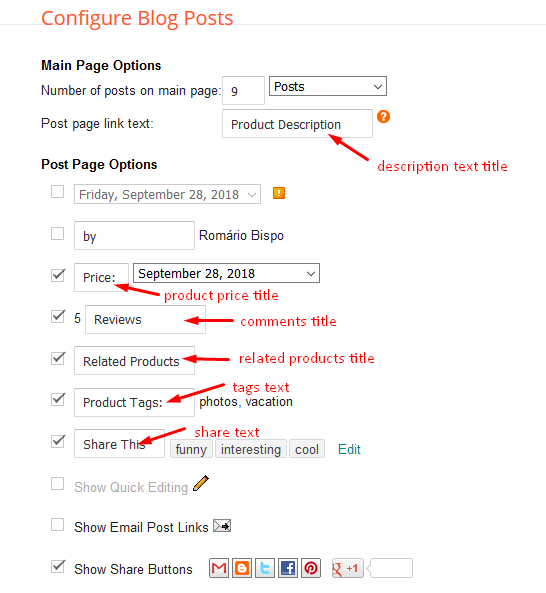
Product Page
Access your blog Layout > click Edit icon on Main Posts/Blog Posts widget.
Brand Logos
Access your blog Layout > click Edit icon on Brand Logos widget.

Access your blog Layout > click Edit icon on Brand Logos widget.
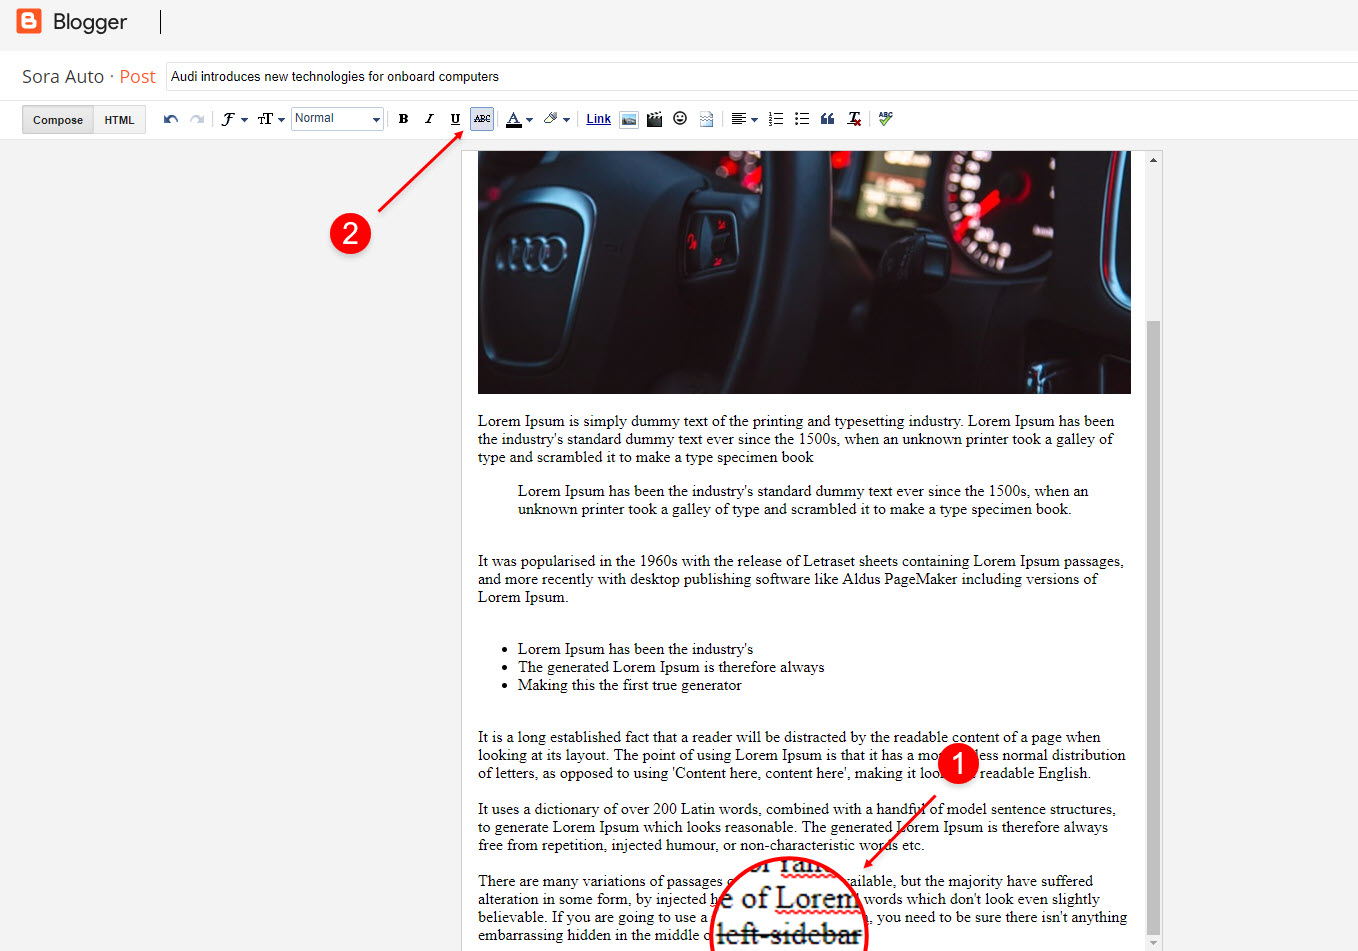
Post Layouts
Left Sidebar: Inside the post add the text left-sidebar and add the style StrikethroughFull Width: Inside the post add the text full-width and add the style StrikethroughRight Sidebar: Inside the post add the text right-sidebar and add the style Strikethrough
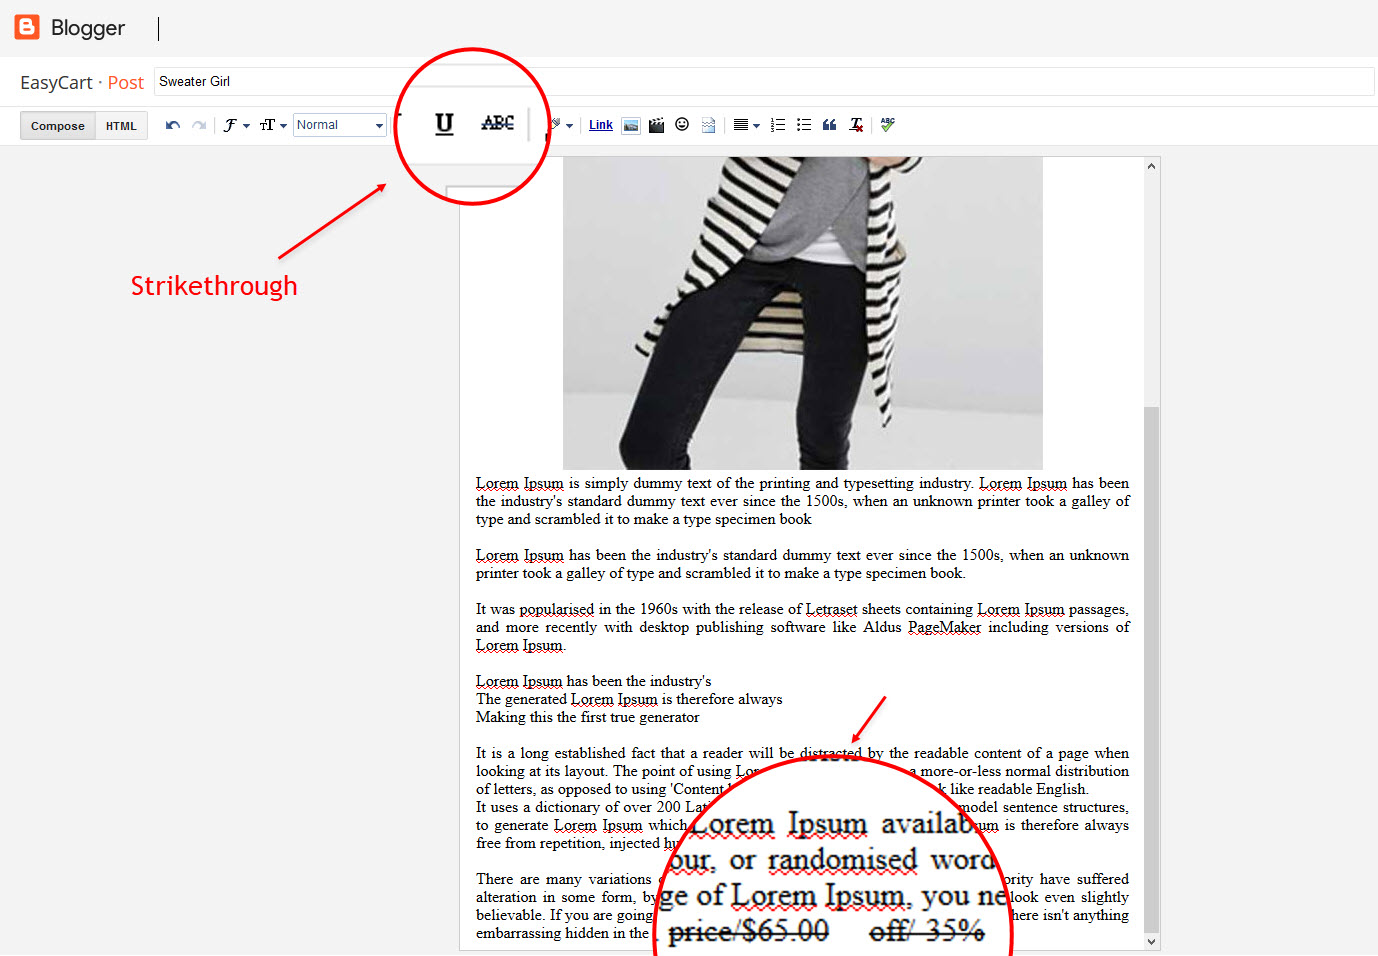
Product Price, Discount and Size
Price Shortcode: price/"Your Product Price"
Discount Shortcode: off/"Your Product Price"
Size Shortcode: size/"Your Product Size 1"/"Your Product Size 2"/"Your Product Size 3"
Price EX: Inside the post add the text price/$59.00 and add the style StrikethroughDiscount EX: Inside the post add the text off/-35% and add the style Strikethrough
Size EX: Inside the post add the text size/35/36/37 and add the style Strikethrough
Discount Shortcode: off/"Your Product Price"
Size Shortcode: size/"Your Product Size 1"/"Your Product Size 2"/"Your Product Size 3"
Price EX: Inside the post add the text price/$59.00 and add the style
Size EX: Inside the post add the text size/35/36/37 and add the style
Cart Page
Access your blog Pages > click New Page > Title , in title enter "cart" (without quotes).
Note:- the cart page will not work if you don't put the title correctly, after adding the title your page link must look like this.
https://sora-cart-soratemplates.blogspot.com/p/cart.html
or
https://www.xyz.com/p/cart.html
Note:- the cart page will not work if you don't put the title correctly, after adding the title your page link must look like this.
https://sora-cart-soratemplates.blogspot.com/p/cart.html
or
https://www.xyz.com/p/cart.html
Checkout Page
Access your blog Pages > click New Page > Title , in title enter "checkout" (without quotes).
Note:- the checkout page will not work if you don't put the title correctly, after adding the title your page link must look like this.
https://sora-cart-soratemplates.blogspot.com/p/checkout.html
or
https://www.xyz.com/p/checkout.html
Note:- the checkout page will not work if you don't put the title correctly, after adding the title your page link must look like this.
https://sora-cart-soratemplates.blogspot.com/p/checkout.html
or
https://www.xyz.com/p/checkout.html
Credit Cards Icons
Access your blog Layout > click Edit icon on Credit Cards widget on Footer.
Icons Avaliables { paypal, visa, master, amex, diners, discover, jcb }
Theme Options
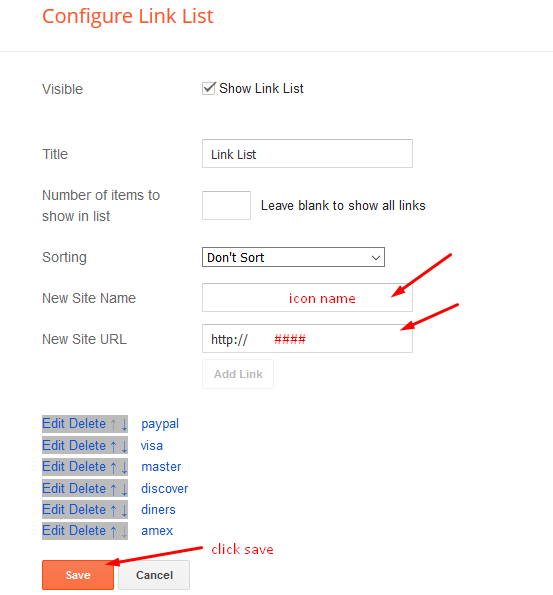
01 - Payment Options
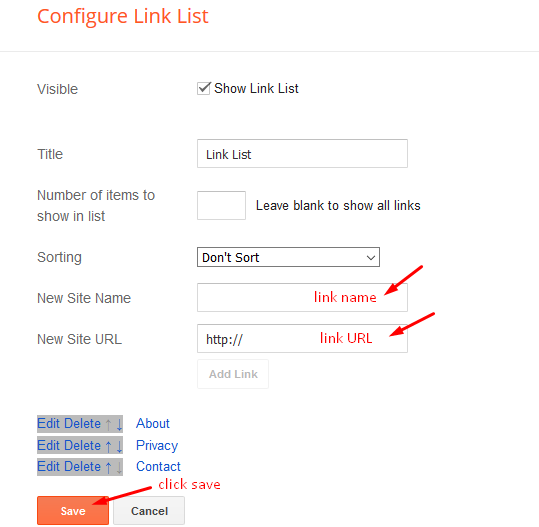
Access your blog Layout > click Edit icon on Payment Options widget.
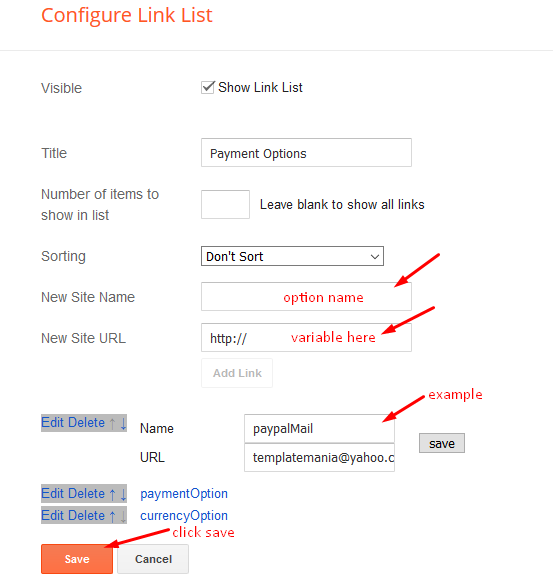
Payment Option: In New Site Name add paymentOption, in New Site URL add your option, after click on save button. default is "PayPal".
PayPal Email: In New Site Name add paypalMail, in New Site URL add your paypal e-mail, after click on save button.
Currency Option: In New Site Name add currencyOption, in New Site URL add your currency, after click on save button. default is "USD".
Shipping Option: In New Site Name add shippingOption, in New Site URL add your shipping price, after click on save button. Note - Shipping price is based on per product".
Available Curencies:"USD" - Currency Name ("US Dollar")
"AUD" - Currency Name ("Australian Dollar")
"BRL" - Currency Name ("Brazilian Real")
"CAD" - Currency Name ("Canadian Dollar")
"CZK" - Currency Name ("Czech Koruna")
"DKK" - Currency Name ("Danish Krone")
"EUR" - Currency Name ("Euro")
"HKD" - Currency Name ("Hong Kong Dollar")
"HUF" - Currency Name ("Hungarian Forint")
"ILS" - Currency Name ("Israeli New Sheqel")
"JPY" - Currency Name ("Japanese Yen")
"MXN" - Currency Name ("Mexican Peso")
"NOK" - Currency Name ("Norwegian Krone")
"NZD" - Currency Name ("New Zealand Dollar")
"PLN" - Currency Name ("Polish Zloty")
"GBP" - Currency Name ("Pound Sterling")
"SGD" - Currency Name ("Singapore Dollar")
"SEK" - Currency Name ("Swedish Krona")
"CHF" - Currency Name ("Swiss Franc")
"THB" - Currency Name ("Thai Baht")
"BTC" - Currency Name ("Bitcoin")
"INR" - Currency Name ("Indian Rupee")
Payment Option: In New Site Name add paymentOption, in New Site URL add your option, after click on save button. default is "PayPal".
PayPal Email: In New Site Name add paypalMail, in New Site URL add your paypal e-mail, after click on save button.
Currency Option: In New Site Name add currencyOption, in New Site URL add your currency, after click on save button. default is "USD".
Available Curencies:
"USD" - Currency Name ("US Dollar")
"AUD" - Currency Name ("Australian Dollar")
"BRL" - Currency Name ("Brazilian Real")
"CAD" - Currency Name ("Canadian Dollar")
"CZK" - Currency Name ("Czech Koruna")
"DKK" - Currency Name ("Danish Krone")
"EUR" - Currency Name ("Euro")
"HKD" - Currency Name ("Hong Kong Dollar")
"HUF" - Currency Name ("Hungarian Forint")
"ILS" - Currency Name ("Israeli New Sheqel")
"JPY" - Currency Name ("Japanese Yen")
"MXN" - Currency Name ("Mexican Peso")
"NOK" - Currency Name ("Norwegian Krone")
"NZD" - Currency Name ("New Zealand Dollar")
"PLN" - Currency Name ("Polish Zloty")
"GBP" - Currency Name ("Pound Sterling")
"SGD" - Currency Name ("Singapore Dollar")
"SEK" - Currency Name ("Swedish Krona")
"CHF" - Currency Name ("Swiss Franc")
"THB" - Currency Name ("Thai Baht")
"BTC" - Currency Name ("Bitcoin")
"INR" - Currency Name ("Indian Rupee")
A) - Upi Options
Access your blog Layout > click Edit icon on Upi Options widget.
In New Site Name add Your Upi Gateway Name, in New Site URL add Your Upi QR Code Image, after click on save button.

Access your blog Layout > click Edit icon on Upi Options widget.
B) - Bank Details
Access your blog Layout > click Edit icon on Bank Details widget.
In New Site Name add Your Bank Details, in New Site URL add Your Bank Detail Values, after click on save button.

Access your blog Layout > click Edit icon on Bank Details widget.
In New Site Name add Your Bank Details, in New Site URL add Your Bank Detail Values, after click on save button.
In New Site Name add Your Bank Details, in New Site URL add Your Bank Detail Values, after click on save button.
02 - Boxed Version
Access your blog Layout > click Edit icon on Boxed Version widget.
In New Site Name add boxedVersion, in New Site URL add true or false, after click on save button.

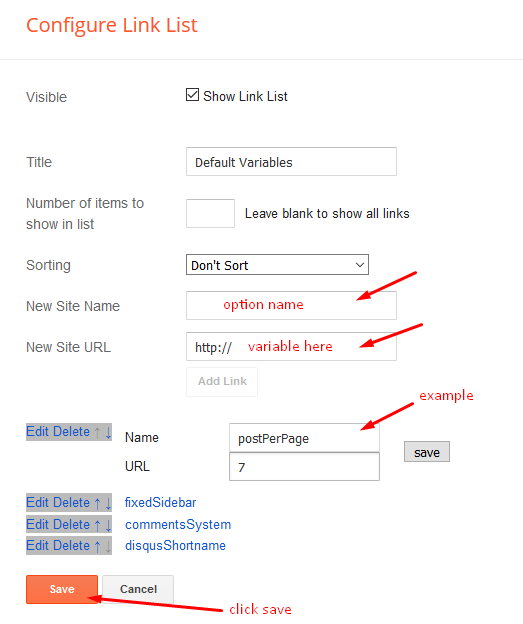
03 - Default Variables
Access your blog Layout > click Edit icon on Default Variables widget.
Post Per Page: In New Site Name add postPerPage, in New Site URL add the number of results, it should be the same as the posts from the home page, after click on save button.
Fixed Sidebar: In New Site Name add fixedSidebar, in New Site URL add true or false, after click on save button.
Comments System: In New Site Name add commentsSystem, in New Site URL add the comments sytem type {blogger, disqus, facebook or hide}, after click on save button.
Disqus Shortname: In New Site Name add disqusShortname, in New Site URL add your disqus comment system shortname, after click on save button.
Facebook Page Plugin
Access your blog Layout > click Add a Gadget > HTML/JavaScript on Sidebar or Footer section, and paste the code below.
<center><div class="fb-page" data-href="https://www.facebook.com/soratemplate" data-width="360" data-small-header="false" data-adapt-container-width="true" data-hide-cover="false" data-show-facepile="true"></div></center>
Note: In Attribute data-href replace the link per your facebook page url.
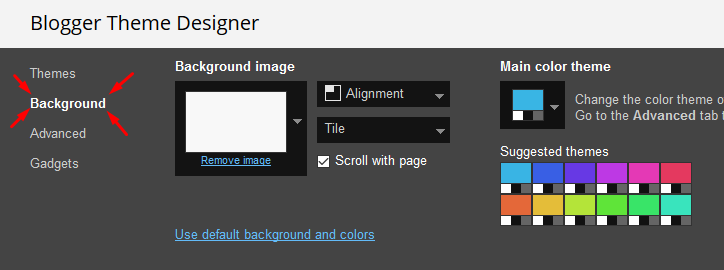
Customizing Your Template
Access your blog Theme > click Customize button.
Here you can change the background, and apply pre-defined colors
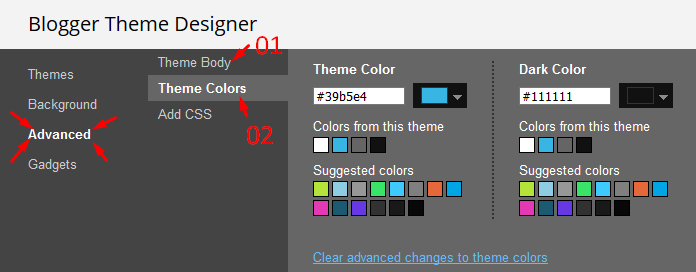
Clicking Advanced You will see the official option to change the Main Colors
Installation And Custom Services
We provide plenty of templates for free but if you want something unique for your blog then let us create a unique design for your blog, Just tell us your needs and we will convert your dream design into reality. We also Provide Blogger Template Installation Service. Our Installation service gives you a simple, quick and secure way of getting your template setup without hassle.
How To Setup Misho Blogger Template
 Reviewed by TemplatesYard
on
December 31, 2023
Rating:
Reviewed by TemplatesYard
on
December 31, 2023
Rating:
Reviewed by TemplatesYard
on
December 31, 2023
Rating:


No comments:
Post a Comment