

How To Setup Insomnia Blogger Template [Way2Themes]

Insomnia blogger template is best suitable for fashion, makeup, daily, OOTD etc blogs, Pre-installed with tons of features to enhance your blog presence. Insomnia is equipped with various of widgets which will help you to publish your blog more professionally. To make it easy for you we have published this detailed documentation, so that you can setup your blog correctly.
You have made a good decision by choosing our template. You can check the live demo or download the template through the button below and also Please Read this documentation carefully in order to set up your blog and please note that there’s no support for free users.
You have made a good decision by choosing our template. You can check the live demo or download the template through the button below and also Please Read this documentation carefully in order to set up your blog and please note that there’s no support for free users.
Video Documentation
You can check this below video to understand the setup process much more easily, just click the below image to watch the video directly on YouTube, or click this link - How To Setup Insomnia Blogger Template - Way2Themes

Top Navigation
On Blogger Dashbord Click Theme
Click Edit HTML
Scroll down and Find this Code :
<div id='top_nav'/><!-- top_nav -->
<ul>
<li><a href='/'>Home</a></li>
<li><a href='#'>About Us</a></li>
<li><a href='#'>Contact Us</a></li>
</ul>
</div>
Change # with your desired url.
Social Top
On Blogger Dashbord Click Theme
Click Edit HTML
Scroll down and Find this Code :
<!-- top_social_icons -->
<div class='header_social'>
<a class='' href='http://facebook.com/' target='_blank'><i class='fa fa-facebook'/></a>
<a class='' href='http://twitter.com/' target='_blank'><i class='fa fa-twitter'/></a>
<a class='' href='http://instagram.com/' target='_blank'><i class='fa fa-instagram'/></a>
<a class='' href='http://dribbble.com/' target='_blank'><i class='fa fa-dribbble'/></a>
</div>
Change # with your desired url.
Main Menu/Dropdown Menu/Multi Dropdown
On Blogger Dashbord Click Theme
Click Edit HTML
(Menu) Scroll down and Find this Code :
<!-- nav-menu -->
<div class='nav-menu'>
<ul class='blog_menus'>
<li><a class='current' expr:href='data:blog.homepageUrl'>Home</a></li>
<li><a href='#'>Category</a>
<ul class='sub-menu'>
<li><a class='' href='#'>Category 1</a></li>
<li><a href='#'>Category 2</a></li>
<li><a href='#'>Category 3</a>
<ul class='sub-menu'>
<li><a href='#'>Category 1</a></li>
<li><a href='#'>Category 2</a></li>
<li><a href='#'>Category 3</a></li>
<li><a href='#'>Category 4</a></li>
<li><a href='#'>Category 5</a></li>
<li><a href='#'>Category 6</a></li>
</ul>
</li>
<li><a href='#'>Category 4</a></li>
<li><a href='#'>Category 5</a></li>
<li><a href='#'>Category 6</a></li>
</ul>
</li>
<li><a href='#'>Photography</a></li>
<li><a href='#'>Lifestyle</a></li>
<li><a href='#'>Archives</a>
</li>
<li><a href='/p/sample-page.html'>Contact</a></li>
</ul>
</div>
Change # with your desired url.
Featured Slider
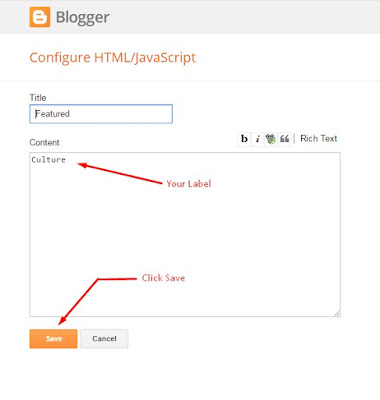
Access your blog Layout > click Edit link on Featured Slider widget.
Featured Post Widget. (Max post - 9)
Note** :- Labels are case sensitive.
Image Example:
Featured Post Widget. (Max post - 9)
Note** :- Labels are case sensitive.
Image Example:
Social Footer
On Blogger Dashbord Click Theme
Click Edit HTML
Scroll down and Find this Code :
<!-- footer_social-icons -->
<div class='footer_social-icons'>
<ul>
<li>
<a class='btn-facebook' href='#' title='Facebook'><i class='fa fa-facebook'/></a>
</li>
<li>
<a class='btn-twitter' href='#' title='Twitter'><i class='fa fa-twitter'/></a>
</li>
<li>
<a class='btn-gplus' href='#' title='Google Plus'><i class='fa fa-google-plus'/></a>
</li>
<li>
<a class='btn-linkedin' href='#' title='Linkedin'><i class='fa fa-linkedin'/></a>
</li>
<li>
<a class='btn-xing' href='#' title='Xing'><i class='fa fa-xing'/></a>
</li>
</ul>
</div>
Change # with your desired url.
Author Box & Social
On Blogger Dashbord Click Theme
Click Edit HTML
Scroll down and Find this Code :
<div class='author_description_container'>
<p>
Lorem ipsum dolor sit amet, consectetur adipiscing elit. Morbi eu sem ultrices, porttitor mi eu, euismod ante. Maecenas vitae velit dignissim velit rutrum gravida sit amet eget risus. Donec sit amet mollis nisi, nec commodo est.
</p>
<div class='authorsocial'>
<a class='' href='http://facebook.com/themewich' target='_blank'><i class='fa fa-facebook'/></a>
<a class='' href='http://twitter.com/ajgagnon' target='_blank'><i class='fa fa-twitter'/></a>
<a class='' href='http://dribbble.com/ajgagnon' target='_blank'><i class='fa fa-dribbble'/></a>
<a class='' href='http://instagram.com/ajgagnon' target='_blank'><i class='fa fa-instagram'/></a>
<div class='clr'/>
</div>
Replace highlighted text and links with yours.
Page Navigation
On Blogger Dashbord Click Theme
Click Edit HTML
Scroll down and Find this Code :
var postperpage=7;
Change 7 with your desired number.
Note:- Remember one thing you have to keep the post count same in your blog settings and pagination widget.
Note:- Remember one thing you have to keep the post count same in your blog settings and pagination widget.
Facebook Page Plugin:
<center><div class="fb-padding"><div id="fb-root"></div>
<script>(function(d, s, id) {
var js, fjs = d.getElementsByTagName(s)[0];
if (d.getElementById(id)) return;
js = d.createElement(s); js.id = id;
js.src = "//connect.facebook.net/pt_BR/sdk.js#xfbml=1&version=v2.3&appId=1395743857335531";
fjs.parentNode.insertBefore(js, fjs);
}(document, 'script', 'facebook-jssdk'));</script>
<div class="fb-page" data-href="https://www.facebook.com/way2themes" data-width="280" data-height="230" data-hide-cover="false" data-show-facepile="true" data-show-posts="false"><div class="fb-xfbml-parse-ignore"></div></div></div></center>
or you can follow this tutorial if above method won't work
Template Customization
Access your blog Template > click Customize.
Colors

Colors
Installation And Custom Services
We provide plenty of templates for free but if you want something unique for your blog then let us create a unique design for your blog, Just tell us your needs and we will convert your dream design into reality. We also Provide Blogger Template Installation Service. Our Installation service gives you a simple, quick and secure way of getting your template setup without hassle.
How To Setup Insomnia Blogger Template [Way2Themes]
![How To Setup Insomnia Blogger Template [Way2Themes]](https://blogger.googleusercontent.com/img/b/R29vZ2xl/AVvXsEiwrwqW9o1UECoN0CcYia36Hl9ifogZ_ypkcR-ePVF8NOjW99dFXmAH4ZodjkojzSnzFmPnMxgduUkgluJzH-lDhY_EtyAZkgmKLb5gO89cvxp1ou5frsgUtqTMcikJm9fmGMX-eyg12LSj/s72-c/Insomnia.png) Reviewed by TemplatesYard
on
May 19, 2018
Rating:
Reviewed by TemplatesYard
on
May 19, 2018
Rating:
Reviewed by TemplatesYard
on
May 19, 2018
Rating:


Sir I want add login and sign in this template it is possible? if yes so How
ReplyDeleteIt isn't possible.
DeleteFeatured Slider
ReplyDeleteAccess your blog Layout > click Edit link on Featured Slider widget.
Featured Post Widget. (Max post - 9)
Note** :- Labels are case sensitive.
Image Example:
is not show in my blog what can i do
Can you change the color orange of the featured slide box?
DeleteYou can do it in simple steps.
DeleteI am sorry! I have a problem on "postperpage"
ReplyDeleteactually I want to make there are 3 post on the page, however, even though I set as 3 in the number, the page only have 2 post. I dont know where I did wrong.
Moreover, I would like to ask how to control the subtitle numbers of wording?
Thank you!
Remember one thing you have to keep the post count same in your blog settings and pagination widget.
DeleteThere is a limit of 1mb from blogger side, only 1mb of images or text you can show in home page and you are exceeding that limit and that is the reason rest of the post is going on next page, there is not any solution, but you can try page break after 1st paragraph in every post, may be this will help.
In this template, it shows many ads above the footer. How can I remove it?
ReplyDeleteBuy Premium
Delete